Authentication
OIDC Authentication
VNS3 Licensing
Access Management
Clientpack Generation
Installing HTTPS
Firewall 2.0
Firewall
AWS Specific features
Firewall FWSets
VNS3 Variables
VNS3 Router
IPsec Configuration
IPsec Parameters
VNS3 Peering Mesh
Setting Topology Name
VNS3 Overlay Network
Snapshot Management
VNS3 Event Alerting
Network Address Translation
Traffic inspection
SNMP Support
VNS3 BGP Configuration Guide
Remote Support
Resetting VNS3
Upgrading
VNS3 Release Notes
VNS3 EOL Policy and Milestones
IPSec Connection Checklist
VNS3 Known Issues
VNS3 Specifications
VNS3 VPN Client tools
VNS3 Control Center
VNS3 setup
VNS3 Licensing
Initialization Options
VNS3 controllers can be initialize in three ways:
- Upload License (choose this when launching the first Controller of a Customer Cloudlet) - Launch a new Controller using the default subnet or use a custom subnet. If launching a Lite Edition from a Cloud Marketplace, this option will read License Parameters.
- Upload runtime snapshot (choose this when recovering from a Controller failure) - Launch a copy of an old Controller using a locally stored snapshot of the running configuration from another Controller instance.
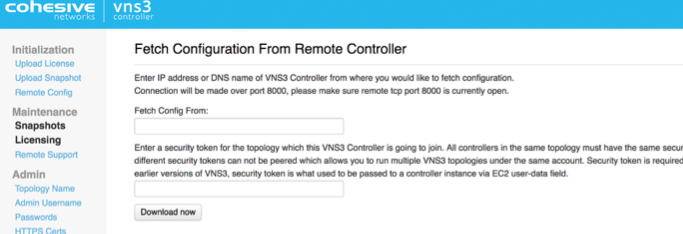
- Fetch remote configuration (choose this when launching a second Controller of VNS3 multi-Controller topology*) - Launch a copy of an existing Controller by grabbing a configuration from a running Controller.

*Multi-Controller Topologies are available in the SME and Enterprise Editions. Controllers can be peered with one another to create a highly available VNS3 Overlay Network.
Option 1: Upload License
Paste the encrypted VNS3 license received from Cohesive in the first field. This license will configure the unlicensed Controller.

If you are using a Free Edition Controller, you can request a Free Edition License from the Cohesive automated license tool by clicking the Registration menu item. If you are using a Lite Edition Controller, the license will be hard-coded and the License Parameters menu item will be available to allow configuration of the Overlay Network Address space.
Click Submit.
Configure Overlay Network Addresses
WARNING: YOUR OVERLAY NETWORK RANGE CANNOT OVERLAP WITH THE CLOUD SUBNET/VPC/VNET.
The resulting screen allows you to choose the VNS3 Overlay Network to be used by your cloud-based client servers. Click the Custom Radio button to specify a custom subnet range. The required fields are:
- Overlay Subnet CIDR (defines the range of addresses that will be available to your Overlay Subnet)
- Controller IPs (each Controller is a member of the Overlay Subnet on the specific addresses defined)
- “My Controller” VIP (an Overlay IP address used by the Controllers for peering and syncing)
- Client IPs (the actual IPs that will be available for your cloud-based Overlay Subnet client servers).

Once you complete this step, the Controller instance will reboot itself and will come up with your specified topology enabled and running. Click Submit and reboot. Skip to Clientpack Generation
Option 2: Upload Runtime Snapshot
If this Controller is a replacement for another Controller in an existing topology and you have a recent runtime snapshot from the old Controller, you can instantiate the Controller by uploading the snapshot. Uploading a snapshot will configure the new Controller the same as the old including using the same Clientpacks for the connected Overlay Network Devices.
Once you have selected a locally stored snapshot, click Submit and reboot.

Option 3: Fetch Remote Configuration
Fetching remote configurations can speed the configuration of Controllers you wish to Peer to an existing topology.
Specify the IP address of the Controller from where you would like to fetch configuration. The security token is used for negotiation between Controller peers and must be the same for all Controllers you intend to Peer with one another.

Click Submit and reboot.
Updated on 24 Apr 2020
