Overview
Proxy64
Plugin Manager
Base container
Web Application Firewall
Bastillion
Speed Test
Datadog
Network Intrusion Detection Plugin with Suricata
PingProxy Driver
PingProxy
HAProxy-Plugin Manager
Do Name Stuff
ntop
CloudWatch Logs
Let's Encrypt
VNS3 HA Plugin
OWASP ZAP Container
Logger plugin
PacketLoss
Overlay EnginePacketLoss
Table of Contents
PacketLoss Container Detail
Getting Started with VNS3 Plugin System
The PacketLoss Container is deployed to VNS3 as a plugin using the container system.
Please be familiar with the VNS3 Plugin Configuration Guide.
PacketLoss Container - What does it do?
The PacketLoss Container runs the Linux utility ‘mtr’ on a user-defined interval, collecting packet loss statistics for each hop between the container and a user-defined IP address (or hostname, where applicable.)
The user defines a WARN percent and an ALERT percent; when packet loss exceeding one of these percentages is detected, a log entry detailing the hop number, hop IP address, and loss percentage will be made to /mnt/logs/plugins/packetloss/packetloss.log
Logs can be analyzed or offloaded by other “Logger” containers running on your VNS3 controller. The log file will be available at /mnt/logs/plugins/packetloss/packetloss.log
PacketLoss Container - What does it need?
The PacketLoss setup script inside the container requires the following information:
- An IP address to which mtr tests will be run.
- The number of ICMP path samplings that mtr will perform before calculating packet loss. ICMP path samplings are run at a rate of 1/second. The higher the number, the more accurate and less granular the results become. If you were to use a value of 1, the only possible packet loss results would be 0% or 100%. That is likely not what you want.
- How often an mtr test will be started (in seconds). This number must be greater than the number of ICMP path samplings to perform during each check, as running multiple mtr processes concurrently often causes accuracy issues.
- A decision regarding how often (in seconds) an “INFO: no packet loss” message will be logged to indicate that the container is still working during periods of no packet loss,
- The percentage of packet loss you consider to be a low-priority issue. When packet loss exceeding this number (but not exceeding the alert percentage) is detected, a “WARN:” message will be logged.
- The percentage of packet loss you consider to be a high-priority issue. When packet loss exceeding this number is detected, an “ALERT:” message will be logged.
Deploying the PacketLoss Container
Getting the PacketLoss Container
The Linux-based (Ubuntu 14.04) PacketLoss Container Image is accessible at the
following URL:
https://vns3-containers-read-all.s3.amazonaws.com/PacketLoss/PacketLoss_20191010.export.tar.gz
This is a read-only Amazon S3 storage location. Only Cohesive Networks can update or modify files stored in this location.
This URL can be used directly in a VNS3 Controller via the Web UI or API to import the container image for use in that controller. (General screenshot walkthrough and help available in the VNS3 Plugin Configuration Guide.)
Uploading the Container Image to the VNS3 Plugin System
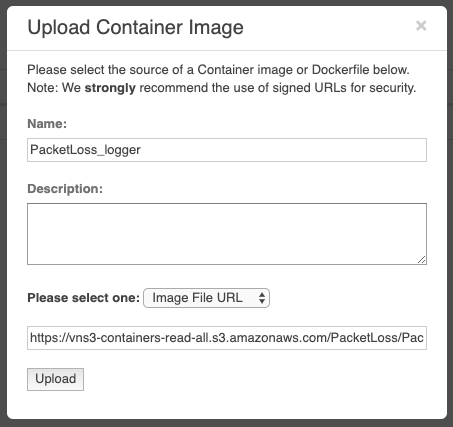
From the Container —> Images menu item, choose Upload Image.
Provide a name for the image and a short description if you wish. The name MUST include the word “logger” in order to provide the container with access to the logging location.
Enter the PacketLoss Container Image file URL:
https://vns3-containers-read-all.s3.amazonaws.com/PacketLoss/PacketLoss_20191010.export.tar.gz
Click Upload.

Allocating a Container from the Image
When the Image has imported it will say Ready in the Status Column.
To then launch a container from the image, choose Allocate from the Action menu.

After selecting Allocate from the Actions menu, name your container, provide a description, and /usr/bin/supervisord as the Command to start the container.
If you are using VNS3 v4.8.2 or newer, you can provide environment variables to the container to configure it without having to SSH into it. These are discussed in the next section.
You can allow VNS3 to auto-assign a container network IP, but it is recommended that you choose one manually. Note this address for the next step.

PacketLoss Container Environment Variables
As an alternative to SSH configuration using the setup script, environment variables can be used to configure the PacketLoss Container in VNS3 v4.8.2 and newer. They should be provided as a comma-separated list of key=“value” pairs.
Here is an example:
host="1.1.1.1",count="30",interval="300",liveness="28800",warn_percent="5",alert_percent="15"
Those settings will:
- Configure the container to check packet loss to Cloudflare’s 1.1.1.1 every 5 minutes, with each mtr process running for 30 seconds (collecting 30 icmp samplings) before calculating packet loss percentages.
- If packet loss greater than 5% is detected, a “WARN:” message will be logged, and if loss greater than 15% is detected, an “ALERT:” message will be logged.
- In the case where there is no packet loss for an extended period, the container will log a message like “INFO: no packet loss” every 8 hours (28800 seconds). (The “liveness” parameter is optional; if not defined or if no value is provided, a default value of 3600 will be used.)
PacketLoss Container Firewall Rules
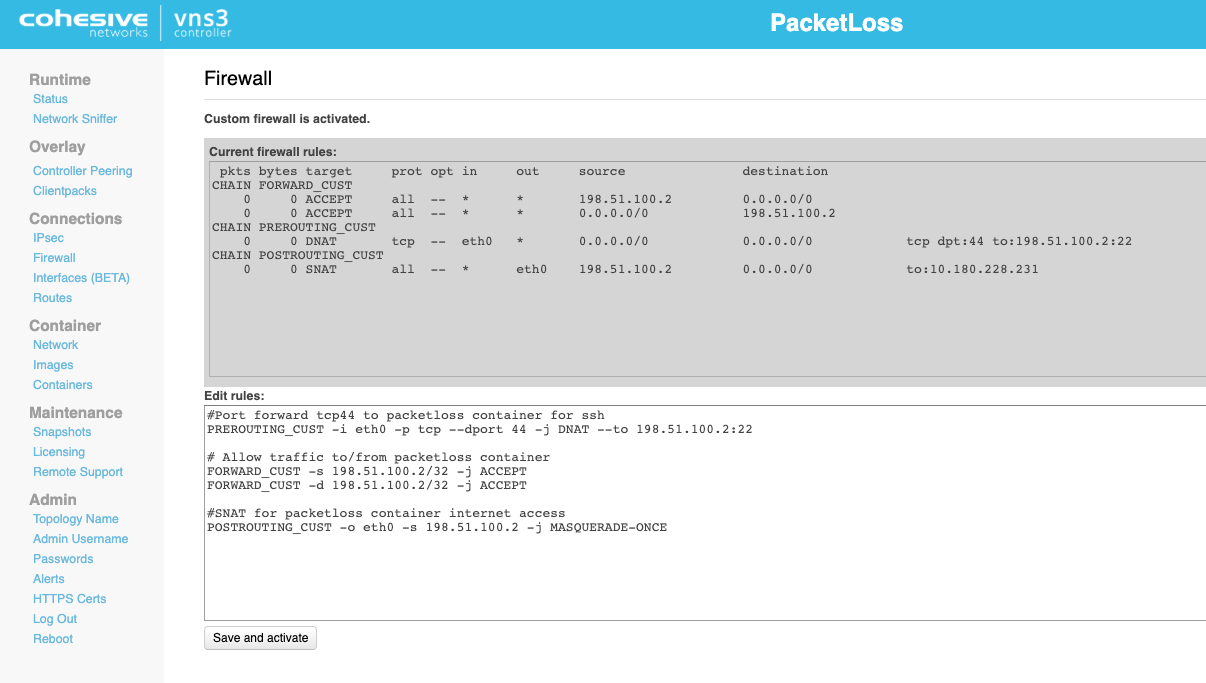
The PacketLoss Container requires the following firewall rules be added to the VNS3 controller:
Anywhere it appears, replace <container_ip> with the container IP you noted in the previous step.
#Port forward tcp44 to packetloss container for ssh
PREROUTING_CUST -i eth0 -p tcp --dport 44 -j DNAT --to <container_ip>:22

# Allow traffic to/from packetloss container
FORWARD_CUST -s <container_ip> -j ACCEPT
FORWARD_CUST -d <container_ip> -j ACCEPT

#SNAT for packetloss container internet access
POSTROUTING_CUST -o eth0 -s <container_ip> -j MASQUERADE

Configure the PacketLoss Container
Configuring the PacketLoss Container
After allocating the container and applying the necessary firewall rules to VNS3, you can SSH into the container on port 44.
The username is container_admin, and the default password is container_admin_123!
We recommend that you change this password immediately: .
~$ sudo passwd container_admin

If you did not provide environment variables when you launched the container, or if you want to change the PacketLoss Container configuration, you can run a simple setup script.
SSH into the container, run ~$ ./setup.sh, and answer the questions as they appear.
The What does it need? section details the information required.
After you have answered all questions, the setup script will save the configuration to /opt/packetloss/parameters.conf and restart the service to make the changes take effect.
Retrieving Logs for Analysis
When a PacketLoss container is running, it will save its log to /mnt/logs/plugins/packetloss/packetloss.log
This file (as well as many of VNS3’s other logs) is available by the use of a “logger” container.
Information about the logger container can be found here: https://docs.cohesive.net/docs/network-edge-plugins/logger/
Testing the PacketLoss container
To test the PacketLoss container, we will have to artificially introduce packet loss. This can be done with the VNS3 firewall using the ‘statistic’ module.
Add the following rule to your VNS3 firewall, replacing [container IP] with the appropriate value:
FORWARD_CUST -p icmp -s [container IP] -m statistic --mode random --probability 0.50 -j DROP
You can alter the percentage of packets that will be dropped by changing the ‘probability’ value. For example, if you wanted to test that your container will WARN at 5% loss and ALERT at 15% loss, you could first set the probability to 0.10 to cause 10% packet loss, then set it to 0.20 to cause 20% packet loss.
Export a Container Image
In the event that your VNS3 controller needs to be replaced or upgraded, you will need a copy of your configured PacketLoss Container. We recommend creating and downloading an image of your container as part of the deployment process:
From the Containers page in the VNS3 web UI, select Action > Save as Image for your new PacketLoss Container. Once that process is complete, you’ll be brought to the Images page. Select Action > Export on the new image, and provide a name.
Once Exporting is complete, you will have the option to download the image locally.
Updated on 10 Oct 2019
