Overview
Network Tools
Proxy64
Plugin Manager
Web Application Firewall
Datadog
Bastillion
Speed Test
Network Intrusion Detection Plugin with Suricata
PingProxy Driver
PingProxy
HAProxy-Plugin Manager
Do Name Stuff
ntop
CloudWatch Logs
Telegraf Plugin
HTTPS Certs Manager
VNS3 HA Plugin
OWASP ZAP Container
Logger plugin
PacketLoss
Overlay Engine
Logger plugin
Table of Contents
Logging Container Detail
Getting Started with VNS3 Container System
The following Logging Container functionality is deployed to VNS3 as a plugin using the container system. These instructions cover customization of a Cohesive Networks supplied Ubuntu-based container image. While you can use any source Linux LXC container image or Docker file you wish, unless you are very experienced with Docker, Cohesive Networks recommends starting with our default container (details in next section).
Getting the Default VNS3_Base Container
The default Linux (Ubuntu 20.04) Container is accessible at the following URL:
https://vns3-containers-read-all.s3.amazonaws.com/VNS3_Base/vns3_base_2004_20210414.tar.gz
This is a read-only Amazon S3 storage location. Only Cohesive Networks can update or modify files stored in this location.
This URL can be used directly in a VNS3 Controller via the Web UI or API to import the container for use into that controller. (General screenshot walkthrough and help available in the Container System Overview document.)
(For older base OS needs, the following images remain available but are not being actively updated or maintained.)
https://vns3-containers-read-all.s3.amazonaws.com/VNS3_Base/VNS3_BASE_1804.tar.gz
https://vns3-containers-read-all.s3.amazonaws.com/VNS3_Base/VNS3_BASE_1404.tar.gz
https://vns3-containers-read-all.s3.amazonaws.com/VNS3_Base/VNS3_BASE_1204.tar.gz
Uploading the Container Image to the VNS3 Controller
From the Container —> Images menu item, choose Upload Image.
The name can be upper, lower, or mixed case. This is required to provide any allocated container from this image to mount the appropriate VNS3 system log files.
To use the pre-configured container paste the URL into the Image File URL box.

Getting the VNS3_Base Container
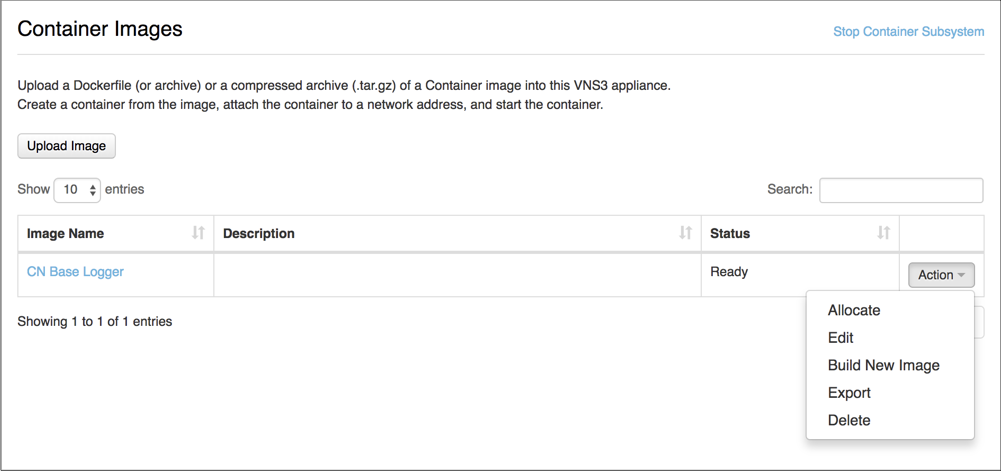
When the Image has imported it will say Ready in the Status Column.
To then launch a running VNS3_Base container, choose Allocate from the Action menu.

Launching a VNS3_Base Container
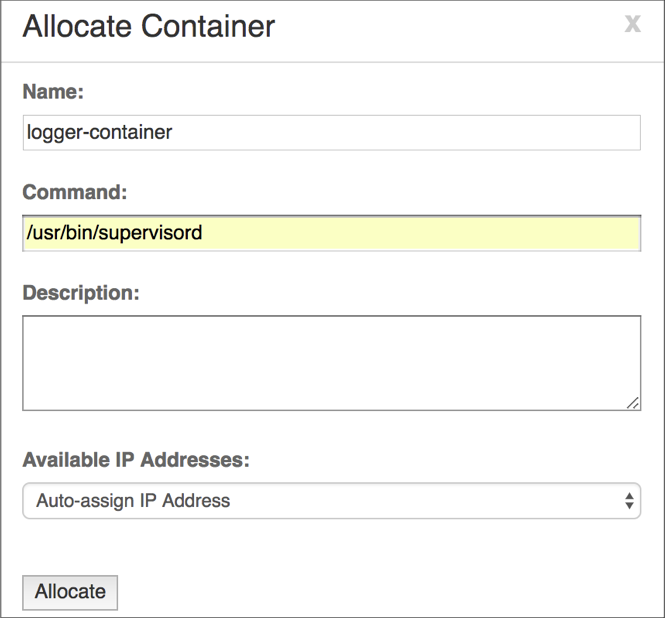
After selecting Allocate from the Actions menu you then name your container, provide a description and the command used to execute the container.
The name and description should be something meaningful within the context of your organization and its policies.
In the cases of using the CN Base Container Image, use the command: /usr/bin/supervisord. This will ensure the ssh daemon is started so you can access the allocated container.

Confirming the VNS3_Base Container is Running
After executing the Allocate operation you will be taken to the Container Display page.
You should see your VNS3_Base Container with the name you specified.
The Status should be Running and it should have been given an IP address on your internal container subnet (in this case 192.51.100.2).

Accessing and Securing the Logging Container
Accessing the Logging Container
Accessing a Container from the Public Internet or your internal subnets will require additions to the inbound hypervisor firewall rules with the VNS3 Controller as well as VNS3 Firewall.
The following example shows how to access an SSH server running as a Container listening on port 22.
Network Firewall/Security Group Rule
Allow port 22 from your source IP or subnets.
VNS3 Firewall
Enter rules to port forward incoming traffic to the Container Network and Masquerade outgoing traffic off the VNS3 Controller’s outer network interface.
#Let the Container Subnet Access the Internet Via the VNS3 Controller’s Outer or Public IP
MACRO_CUST -o eth0 -s <VNS3_Base Container Network IP> -j MASQUERADE
#Port forward port 44 to the Container port 22
PREROUTING_CUST -i eth0 -p tcp -s 0.0.0.0/0 --dport 44 -j DNAT --to <VNS3_Base Container Network IP>:22
#Copy all incoming tun0 (Overlay Network) traffic to the TCP Tools Container
Macro_CUST -j COPY --from tun0 --to 198.41.100.3 --inbound

Securing the VNS3_Base container
By default the container has the following accounts, configured as described.
“root” - The root account is locked. The root account is not allowed to remote shell into the container. This is our recommended approach. However, if you wish to, you can use the “container_admin” account to unlock root, provide a root password, and edit /etc/ssh/sshd_config to allow remote login by root.
“container_admin” - The default password is container_admin_123! The default demo public key is also installed in the /home/container_admin/.ssh/authorized_keys. _PLEASE change this password and this key_ when configuring, or create a new default plugin container image as your base for future use, following your authentication procedures. The account
“container_admin” has “sudo” or superuser privileges, and is allowed to remote shell into the container.
By default the VNS3 Base container is configured for username/password login. You can customize the container for SSH key usage by allocating an instance of the container, modifying sshd_config to not allow password authentication, entering your public key into /home/container_admin/.ssh/authorized_keys and save a new custom base image for your use.
Accessing via the default private key
Here is the default private key for initial login:
-----BEGIN RSA PRIVATE KEY-----
MIIEoAIBAAKCAQEA1pIQ/2VxIR6DJx4/mKKfZJ2EuhAe+jJaXnbYMq33Zryum5ku/r7KKcgR97R7GV0McHo23BJP/SoQrbyvIwRVBurnH32Okxl/ymX0YeudOlLh2/R/palDnPVOtuQnY836poGxp3/X2H86/MgrHOclbeGy8Ezm6+zwnl18VccqiGYMW06ca2qLGVMIh6WD03/p++l+QEPRmhAzfqWZJ02GG12lCK7ECODRELR0Y+ppe+yg2DaFQI8gywRDa6l9v7BTEc5l/k3j2xqJxNXaBVzgjCJmVc7dfgfR1io31IHiTw1M8YPf5lNpMdfiV4DjcG9f6GcUuO6uXgMZucnQT3ldfwIBIwKCAQAGIW4zLsi3zav5zaoLrN/7j3jSHbe+AXBL14KFGunPvD+AydzFcypY9xZ0yqRucF9w7YyJ8eUHO7dVa8p9V+UsFVcPhz6WfRJHnINTQT8Bqpi9JD4pTfqeFaMpzAEgG9P2IPZyf/7aTMcryzRuikLl4eCKhdq2SJkpGJ0nBbDCEX3p8H9jDWKlPxZ4vEbeqZeDMV+PPhVjUtrElAMBamJY3/WmGPRH90pOO47vnZ+rSd/GLDpEuGYvjU7F64cBZUQbf4rYTCGW3dCyuw5giChEeiOvbYEYRffEh0/fv3Bn31qFteeY7HXOSAGrRm/KuUxejkTTs3RZBOjFLmBjUuCrAoGBAPbWMrEueimj0zQcfxBlKFaph0DQQTFEXg0evgv+RitXdChooB9SmOe2sOYbY36DX6V6QTzNsHOEoLuqdShPi3a9JIDyOAXdIBMTqt2SvywRBPJQffFoCJ+/AbrfVr6Seu45C5t+aYlS8nULbphqp8Cvyof4ldV+5KyGtbllaNlPAoGBAN6JOoCyG+Td38HpaML9J9xioizahbPBXj1/qyP3e+idSubqpT7feMCn3wOF+haNc2NF6VENqLTGEcKyAOA/TIySOel5rUZdpu5BmAVAADMeapMJWEXEblI4qJFd/sWJCP5wmZp/lcSrDTLhcQJOci5LKSPOz/Czcpo9vOlVu8zRAoGAd+Rhw8YeFDmhGU+rbl0E9uSgx7WcAfyitepcTvfY8HrvRtO7fO2aubCBztoaYgVLtsZaM3nZXK4iL0QqRseM4ebXN1ET5ZdKF+T7OGvZMqkuSc9THXusatkeGPAi0Zeay3rLH6PM3EzcKjjAsG5RetkKmdCDSnDVeF6wCZen9IUCgYAMt2JtwQjogbUDxDHfQaqBnzx3l3VaupervicJXpldv9hk93coKgbmb/4ddV6/dcwUTSNGdc8gRdUhEXxklecd+boqmT0Z9rkU7c4sL4r7m1aMDymdljIwlYX5rZmHoW46bNWTzMa6x/IgKiO2/SsYlpSi9d//IDJvNrpWee15awKBgAczjW0Ag+nosFzklHhDAWIEZ+qgvdMcXf8pTOzgo0wyOl4SYTccp82Ffxee25d8DyolvGgRjfDXKMyw7zfzwiknsZozEGNFDW+sgsPR9Pe1SQx07PtnUUflb3/Cv5LiLZmgW+RFvQf7lGqQpQSpfPuY6H8vwjxlA89SP3UwTi4N
-----END RSA PRIVATE KEY-----
Primary files for customization
There are two significant files for securing the VNS3_Base container:
/etc/ssh/sshd_config .
Please ensure this file is configured to your organization’s best practices.
/home/container_admin/.ssh/authorized_keys
The base container comes with an example public key installed, and private key for use in VNS3 documentation. Please remove after initial use or programmatic configuration.
Available Log Files
Log Files available via the Logging Container:
/mnt/logs/auth.log
/mnt/logs/boot.log
/mnt/logs/dmesg
/mnt/logs/kern.log - VNS3 kernel log
/mnt/logs/syslog - VNS3 system log
/mnt/logs/vnscubed_api_background.log
/mnt/logs/vnscubed_api_server.log
/mnt/logs/vnscubed_bgpmon.log
/mnt/logs/vnscubed_monitor.log
/mnt/logs/vnscubed_webui.log
/mnt/logs/webserver_access.log
/mnt/logs/webserver_error.log
/mnt/logs/vnscubed_api_background/completed/ - Directory showing completed API calls
/mnt/logs/vnscubed_connection_logs/ipsec.log - IPsec system log files
/mnt/logs/vnscubed_connection_logs/tun0.log - Overlay Network server connection log files
/mnt/logs/vnscubed_connection_logs/unauthorized.log
./mnt/logs/version.log (this contains one row with the VNS3 version on it for use in scrpts which need to be version dependent)
Log file rotation
VNS3 controllers rotate log files to both ensure a useful log history is available at all times without taking up too much disk.
Log files on VNS3 are rotated weekly with a history of 14 log files compressed and retained. As a result the previously mentioned log directory available in the Logging Container (/mnt/logs) may include some additional historical files
Options for Consuming the Log Files via Logging Container
Once the Logging Container has been correctly allocated, adding agents/collectors to the Container will allow 3rd party services/applications to consume the logs and custom alerts can be configured.
Services like CloudWatch Log Agent, SumoLogic, and LogicMonitor are common choices.
Updated on 14 Aug 2019
