
LDAP
Overview
Getting Started with VNS3 Plugin System
Please be familiar with the VNS3 Plug-In Configuration Guide.
LDAP Dirctory with LDAP Manager - What does it do?
Provides an LDAP directory with LDAP Manager administrator:
- OpenLDAP directory (https://https://www.openldap.org)
- LDAP Account Manager 9.0 (https://www.ldap-account-manager.org/lamcms)
- Enables users configured in LDAP to log into VNS3
LDAP - What does it need?
- Firewall rules for LDAP 389 or 636
- Firewall rules for LDAP Manager 8443
Deploying
Getting the Image
The image is available in the VNS3 UI through the Plugin catalog. Simply navigate to the Plugins -> Catalog page, find the LDAP plugin, and click Install.
If you are not using the catalog, you can import the image using these url’s:
https://cohesive-networks.s3.us-east-1.amazonaws.com/extras/ldap-docker-plugin-AMD64-20260827-v1.0.0.tar
https://cohesive-networks.s3.us-east-1.amazonaws.com/extras/ldap-docker-plugin-ARM64-20260827-v1.0.0.tar
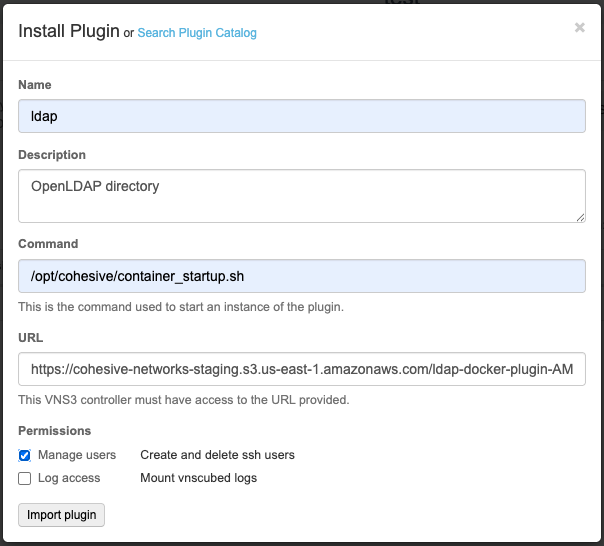
In either case, once the image has imported successfully, its state in the Status Column will change to Ready.
Quick Start using the Default Directory
Click on the Plugin Dashboard, select Start Instance from the Image’s Action menu.
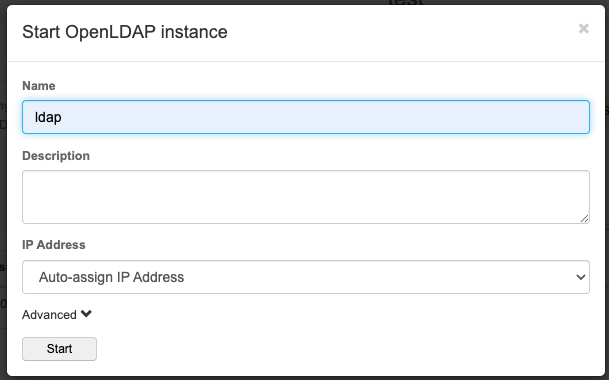
Type in the name you want and click to start the plugin. This will start an LDAP directory using.
Next, configure the firewall rules as seen below in “Required Firewall Rules”.
Now you are ready to configure VNS3 to use the LDAP service, click on Identity Management on left.
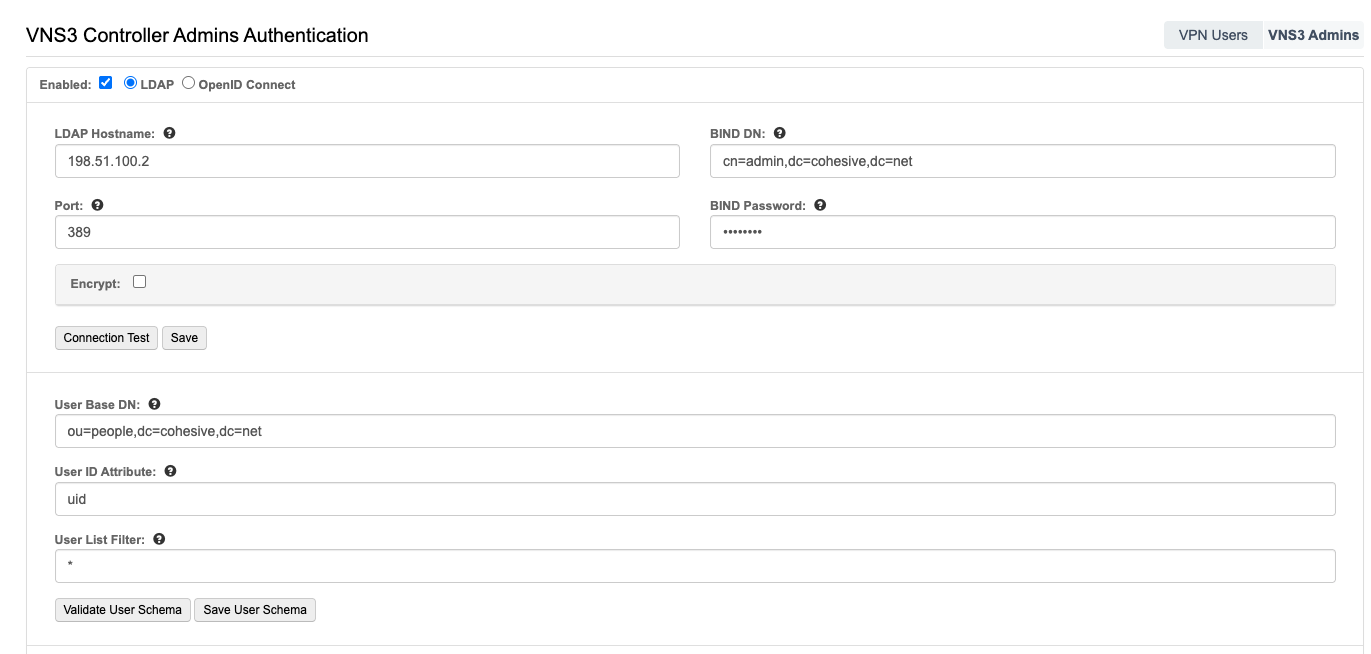
Click test, note the password is testtest.
You should see Connection sucdessful.
Then click on Validate User Schema, a default user name testuser was created with the password test123!
You can now click logout, and log into VNS3 using testuser credentials.
It is suggested to first get familiar with the plugin using the defaults, browse OpenLDAP, LDAP Account Manager and Identity Management on VNS3.
Once you are comfortable, delete the plugin, and start again using your custom domain and password.
Starting the Plugin with Custom Directory
Click on the Plugin Dashboard, select Start Instance from the Image’s Action menu.
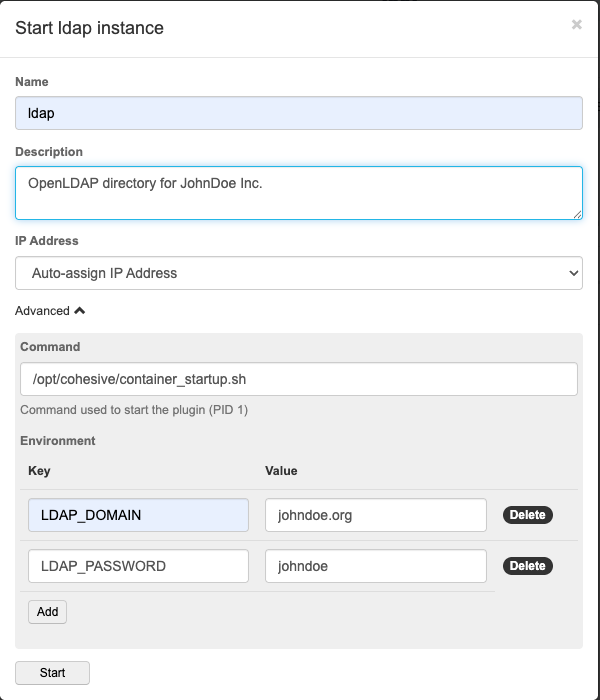
Name your container, provide a description (optional), and use /opt/cohesive/container_startup.sh as the Command to start the container.
You can allow VNS3 to auto-assign a container network IP, but it is recommended that you choose one explicitly. Take note of this address for the following steps.
For a custom domain, configure the following environment variables, defaults are shown:
LDAP_DOMAIN = cohesive.net
LDAP_PASSWORD = testtest
Required Firewall Rules
This plugin requires the firewall rules listed below.
For Administrator to configure Identity Management using LDAP port 389
POSTROUTING -o eth0 -s 198.51.100.0/24 -j MASQUERADE
PREROUTING -i eth0 -p tcp -s 0.0.0.0/0 --dport 389 -j DNAT --to 198.51.100.2:389
FORWARD -s 198.51.100.2 -j ACCEPT
FORWARD -d 198.51.100.2 -j ACCEPT
INPUT -s 198.51.100.2 -p tcp --sport 389 -j ACCEPT
OUTPUT -d 198.51.100.2 -p tcp --dport 389 -j ACCEPT
For Administrator to configure Identity Management using LDAPS port 636
POSTROUTING -o eth0 -s 198.51.100.0/24 -j MASQUERADE
PREROUTING -i eth0 -p tcp -s 0.0.0.0/0 --dport 636 -j DNAT --to 198.51.100.2:636
FORWARD -s 198.51.100.2 -j ACCEPT
FORWARD -d 198.51.100.2 -j ACCEPT
INPUT -s 198.51.100.2 -p tcp --sport 636 -j ACCEPT
OUTPUT -d 198.51.100.2 -p tcp --dport 636 -j ACCEPT
To Use LDAP Acccount Manager to manage your LDAP directory
PREROUTING -i eth0 -p tcp -s 0.0.0.0/0 --dport 8443 -j DNAT --to 198.51.100.2:8443
INPUT -s 198.51.100.2 -p tcp --sport 8443 -j ACCEPT
OUTPUT -d 198.51.100.2 -p tcp --dport 8443 -j ACCEPT
Access LDAP for external tools such as ldapsearch (choose 389 or 636) POSTROUTING -o eth0 -s 198.51.100.0/24 -j MASQUERADE PREROUTING -i eth0 -p tcp -s 0.0.0.0/0 –dport 389 -j DNAT –to 198.51.100.2:389 PREROUTING -i eth0 -p tcp -s 0.0.0.0/0 –dport 636 -j DNAT –to 198.51.100.2:636
Using SSH (ssh into plugin and configure OpenLDAP directly using ldapmodify)
PREROUTING -i eth0 -p tcp -s 0.0.0.0/0 --dport 44 -j DNAT --to 198.51.100.2:22
Configuring LDAP
LDAP Account Manager is provided with OpenLDAP for LDAP Administration.
In the Plugin Instance view, see the Ports section, click on Goto UI
This will bring up the LDAP Account Manager administrator.
For more info, see https://www.ldap-account-manager.org/lamcms
Once you log into LDAP Account Manager, set your passwords and create a profile, use Tree view to view your groups and users.
Using Plugin Manager
Click the name of the plugin instance or choose Manage from the Action menu.
You can do the following by running scripts:
Setup LDAPS: Turn on LDAPS, click and Run.
Change Admin Password: Change admin password to a random generated password, click and Run.
Reset LDAP Cert: Reset the LDAP cert and reads the host name from the cert.txt config file.
Reset LDAP Manager UI Cert: Reset the LDAP Manager cert and reads the host name from the cert.txt config file.
Final Notes
VNS3 will include your plugin configuration in its system snapshot. VNS3 Management System provides options for automatic scheduled snapshotting.
Upon recovery with a snapshot file, VNS3 will attempt to download all plugin images from their original URLs and reinstall their saved configuration.
Please reach out to support@cohesive.net with any issues or questions.