VNS3 NATe
Introduction
VNS3 NATe is a custom, pre-configured NAT-Gateway appliance built on the Cohesive Networks VNS3 Platform.
It is ready to run as a NAT-Gateway instance with just a few guidelines and operations for use in your specific Cloud environment like AWS, Azure, Google and more.
Our goal is to deliver a network tool that performs the basic NAT-Gateway functions but can be upgraded if needed, to the capabilities of a full VNS3 Application Security Controller.
NO DATA TAXES!
There is no additional “taxation” for your data to pass through the NATe device - except for standard cloud traffic charges
What is included?
This device includes firewall functions allowing outbound source and port NAT-ing and can limit outbound NAT to specific ports or destination addresses. Additionally, plugins can be used to provide outbound WAF or outbound URL filtering to a small “allow list” or via connection to a URL filtering service like Webroot’s BrightCloud offering.
This configuration DOES NOT include multi-cloud, site-to-site connectivity, or a number of other capabilities provided by the VNS3 Application Security Controller. Traditionally VNS3 controllers are used to create ingress/egress service networks providing north/south and east/west connectivity and security for cloud based systems, as well as machine-to-machine VPN for full encryption of data-in-motion to, through, and across the clouds.
NOTE: All VNS3 controllers regardless of SKU (including this edition) can be live upgraded to provide any capabilities your cloud use-case requires. If more extensive networking and cloud edge capabilities are required (Contact Cohesive Networks)
Basic Configuration Overview
This appliance instance should be running in its own cloud subnet with a distinct routing table from other subnets. In the route table for the NATe instance - set a 0.0.0.0/0 route to the cloud network’s Internet gateway. For other instances to use NATe as the NAT Gateway, their routing table should have a 0.0.0.0/0 route pointing to the NATe instance/network address.
What does this do for me?
- Function as outbound NAT-Gateway using inexpensive instance types for most use-cases.
- For use-cases requiring less than 50mbps - there is a NATe Free edition
- Firewall can be configured for secure inbound NAT using port redirection.
- Allows one remote VPN user connection for secure remote administration.
Cloud Security Group Setup
NATe instances launched via the Cloud Provider Marketplaces will have the security groups already open for inbound traffic from 0.0.0.0/0 on the following port as part of the listings. IF your NATe instance is launched via private AMI or Image sharing, you will need inbound security group rules opened for the following ports.
- TCP port 8000 - VNS3 NATe HTTPS UI and API access port. Open inbound access from any IP you want to access the VNS3 UI or API from.
- OPTIONAL: UDP port 1194 - NATe secure VPN administration port. Open inbound access for any IP you want to connect to the VPN from.
Static IP
We highly recommend associating a static public IP or Elastic IP to your NATe instance. This provides flexibility in the event you need to upgrade or if there is an underlying cloud failure.
NOTE: If you add the static IP after the NATe is launched, reboot the instance via the Cloud Portal and access the UI via the newly associated static public IP.
Allow NATe to route packets
Cloud infrastructures have varying ways of describing the operation to allow an instance to act as a router (forward packets that are sent to it with a destination address different from the instance). For NATe to work - the instance needs to be allowed “routing” privileges.
AWS calls this “Disable Src/Dest Checking”.
Azure calls this “Enable IP Forwarding” (on the network interface object IP configuration)
Google calls this “Choose ON for IP Forwarding” (on the network interface interface)
Getting Help
NATe comes with free forum support that is provided on a best effort basis.
At Cohesive Networks we pride ourselves on the quality support we provide to our users and customers. We want to make sure you have all the materials to be independently successful with VNS3. In cases where you do need help, don’t hesitate to create a forum post and a member of our Support Team will respond.
If you need additional support outside of the capabilities provided by our free forum, we are of course happy to help but a commercial agreement may be needed. Feel free to contact us and we can review our premium Support Plans.
Remote Support
In the event Cohesive needs to observe runtime state of a VNS3 Controller in response to a tech support request, we will ask you to open Security Group access to TCP port 22 (SSH) from our support IP, 54.236.197.84, and Enable Remote Support via the Web UI.
Note that TCP 22 (ssh) is not required for normal operations.
Each VNS3 Controller is running a restricted SSH daemon, with access limited only to Cohesive for debugging purposes controlled by the user via the Remote Support toggle and key exchange generation.
Cohesive will send you an encrypted passphrase to generate a private key used by Cohesive Support staff to access your Controller. Access to the restricted SSH daemon is completely controlled by the user. Once the support ticket has been closed you can disable remote support access and invalidate the access key.
Login
AWS Login Information
- VNS3 Web UI - https://VNS3-ip:8000 (e.g. https://123.123.123.623:8000)
- Default UI username - vnscubed
- Default UI password - instance id (e.g. i-0d9098dc28f8229b)

Azure Login Information
- VNS3 Web UI - https://VNS3-ip:8000 (e.g. https://123.123.123.623:8000)
- Default UI username - vnscubed
- Default UI password - VNS3_VM_name-VNS3_private_IP (e.g. vns3prod-10.0.0.5)
- (In legacy versions prior to 4.4.0, the default password in Azure is “vnscubed”.)

Reset Default Passwords
Reset your passwords: Reset the Web UI Password - Even though the instance id is unlikely to be “guessed”, please change it for security purposes. Reset the API Password. Making it a different password than the web interface is probably best.

NOTE: Your VNS3 Controller answers to API calls on the same port 8000 as the web interface runs on. Ideally make a separate password for the API usage against the Controller.
Cohesive does not have any key access or remote access to your VNS3 Controllers unless provided by you. If you forget these passwords we cannot recover them for you but in AWS you can recover via User Data.
Review Default Firewall Rules
The VNS3 firewall allows users complete control of the INPUT, OUTPUT, FORWARDING, PREROUTING and POSTROUTING behavior of traffic as it first enters and as it exits the VNS3 PeopleVPN controller.
The VNS3 internal firewall is still there to “protect” the internal mechanisms of VNS3, however, customer rules can be created that have undesirable effects. Essentially rules that ACCEPT or REJECT/DROP all traffic are likely to create a device that is un-reachable or one that is too permissive in accepting traffic.
Customer rules are evaluated and if there is not a match in the _CUST chains, then they flow through into the interior VNS3 chains which are quite restrictive. Accepting all traffic prevents most of the interior rules from being evaluated which might block unsafe traffic. Blocking all traffic prevents most of the interior rules from being evaluated which accept necessary traffic such as the API and WebUI management utilities. (Blocking port 8000 from all traffic will make the VNS3 instance un-manageable.)
NATe comes with an initial set of rules for the VPN user use case. These rules NAT (network address translate) traffic from the VPN to the Internet. The allow connections from the VPN network to the Internet - and response traffic to that outbound traffic. They DO NOT by default allow any access to the VPN network. Additionally, by default they DO NOT allow VPN users to access each others device. (Although there are use-cases where you might want this to happen.). See the VNS3 Firewall overview to learn more about how the VNS3 Platform’s firewall works.
Below the image shows the default firewall rules.
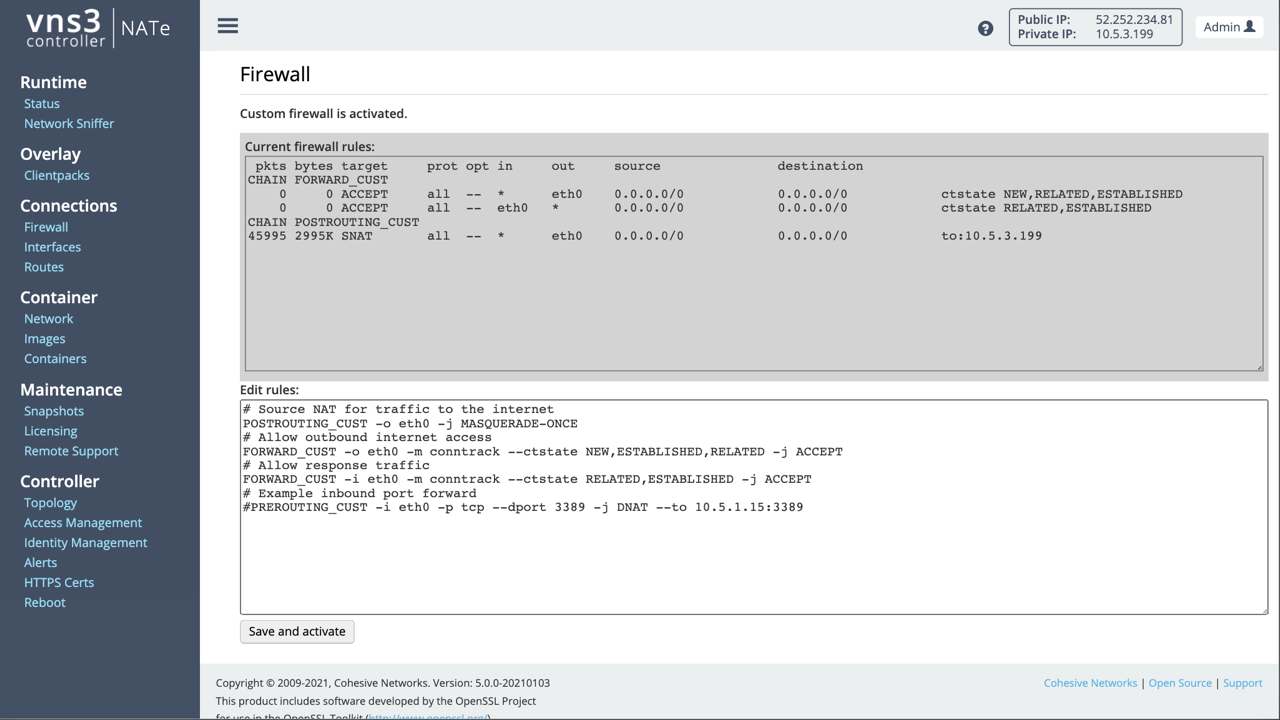
# Source NAT for traffic to the internet
POSTROUTING_CUST -o eth0 -j MASQUERADE-ONCE
# Allow outbound internet access
FORWARD_CUST -o eth0 -m conntrack --ctstate NEW,ESTABLISHED,RELATED -j ACCEPT
# Allow response traffic
FORWARD_CUST -i eth0 -m conntrack --ctstate RELATED,ESTABLISHED -j ACCEPT
# Example inbound port forward
PREROUTING_CUST -i eth0 -p tcp --dport 3389 -j DNAT --to 10.5.1.15:3389
# Example allpw port forward DNAT to 10.0.1.15
FORWARD_CUST -i eth0 -d 10.0.1.15 -p tcp --dport 3389 -j ACCEPT
Secure Administration (Optional)
NATe comes with a single VPN user credential to allow administration via VPN client vs. over the Internet. Over the Internet the NATe web console is reached on port 8000 on the Public IP of the NATe instance. Via the VPN use the default NATe VPN address of 100.127.255.254.
In order to connect for secure VPN administration your remote device will need a Clientpack file and an OpenVPN client.
- A Clientpack can run on a single client at a time.
Click on Clientpacks in the left column menu to see your single clientpack credential. Using the “Action” menu to the right of it, choose the “Enable” option in order to allow your credential to connect to the NATe device.
Install any OpenVPN client software on your administration device. We like Viscosity, it is high quality and reasonably priced. You can also use the OpenVPN Community client free of charge.
For more information on using your secure administration VPN credential see the Clientpack Configuration section in the VNS3 PeopleVPN document
Recommended Best Practices
- Disable any Clientpack not current distributed to a remote user/in use. This will ensure only your active users are joining the Overlay Network.
- Regenerate any Clientpack that is lost or was in the possession of a remote user that is no longer with the team. This is the equivalent of a certificate revocation list.
- Utilize the VNS3 Firewall to filter traffic for your particular use-case. This could mean either explicitly allowing or rejecting/dropping traffic between remote users via the Overlay Network.
Useful Links
- VNS3 Administration Document - Learn more about your NATe features and functions like Firewall, Routes, Snapshots, and more.
- VNS3 Plug-in Container Guide - NATe includes the capability to run one (1) Plug-in as part of the license.
- VNS3 Network Security Plug-in Marketplace - List of some free curated L4-L7 Network Service Plug-ins.